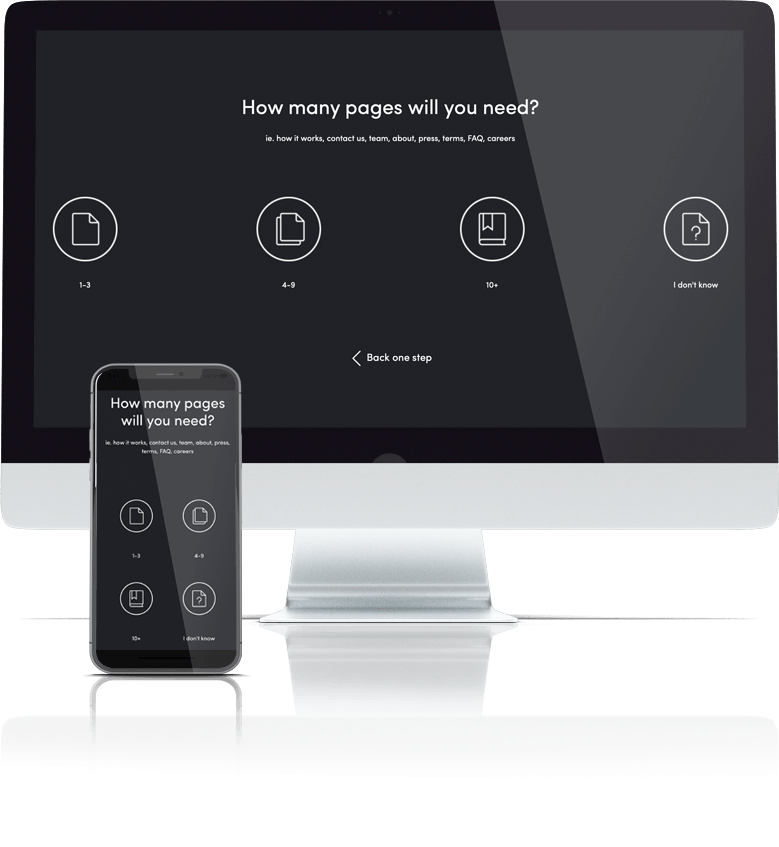
Answer 8 quick questions to get a personalised quote from Webski
October 23 2013
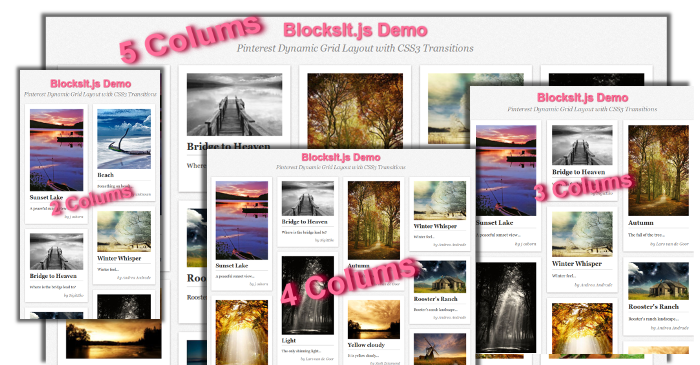
Let me introduce you the jQuery plugin that you’ll might use on the next project when the client will ask for a Dynamic Grid Layout similar to Pinterest.
I give you the BlockIt.js. It’s an easy-to-implement and light-weight jQuery Plugin for dynamic and responsive pinterest-like layout.
First, include the jquery min library then the blocksit java script in the head tag of the html:
<script type="text/javascipt" src="jquery.min.js">script>
<script type="text/javascipt" src="blocksit.min.js">script>
Then call the main function .BlocksIt() :
$(document).ready(function() {
   $('#container').BlocksIt({
      numOfCol: 5,
      offsetX: 8,
      offsetY: 8
   });
});
The following image describes what of the parameters in the main function stand for:

The following javasript code allows the resizing the browser and changing the number of coulms depenging the size of the screen:
var currentWidth = 1100;
    $(window).resize(function() {
        var winWidth = $(window).width();
        var conWidth;
        if(winWidth < 660) {
            conWidth = 440;
            col = 2
        } else if(winWidth < 880) {
            conWidth = 660;
            col = 3
        } else if(winWidth < 1100) {
            conWidth = 880;
            col = 4;
        } else {
            conWidth = 1100;
            col = 5;
        }

        if(conWidth != currentWidth) {
            currentWidth = conWidth;
            $('#container').width(conWidth);
            $('#container').BlocksIt({
                numOfCol: col,
                offsetX: 8,
                offsetY: 8
            });
        }
    });
And the following code is an example of how to implement the plugin.
<div id=”container”>
<div class=”grid”>
<div class=”imgholder”>
<img src=”/images/img1.jpg” />
</div>
<strong>Sunset Lake</strong>
<p>A peaceful sunset view…</p>
<div class=”meta”>by j osborn</div>
</div>
<div class=”grid”>
<div class=”imgholder”>
<img src=”/images/img2.jpg” />
</div>
<strong>Herringfleet Mill</strong>
<p>Just a herringfleet mill…</p>
<div class=”meta”>by Ian Flindt</div>
</div>
.
.
.
<div class=”grid”>
<div class=”imgholder”>
<img src=”/images/img3.jpg” />
</div>
<strong>Sundays Sunset</strong>
<p>Beach view sunset…</p>
<div class=”meta”>by Robert Strachan</div>
</div>
</div>
For this totorial I've uploaded the demo and the zip of the source files, use the following links:
Click » BlocksIt.js jQuery « to view the DEMO
Click » BlocksIt.js jQuery « to DOWNLOAD the EXAMPLE
February 20 2012
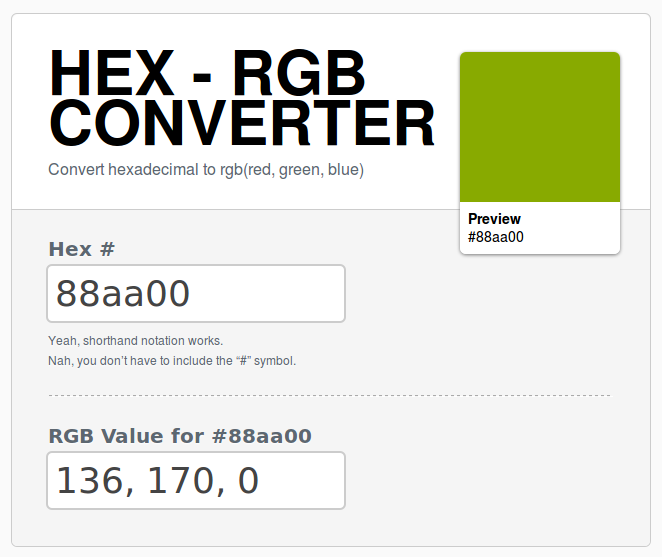

I wrote this blog post for everyone that have searched for Hexadecimal to RGB converter and not found something according to their needs. This Hex-RGB converter is not only easy for installation, also it is written in jQuery and that makes it more easier for modification and customisation.
hexToRgb: function(hex) {
var result = /^#?([a-fd]{2})([a-fd]{2})([a-fd]{2})$/i.exec(hex);
return result ? {
r: parseInt(result[1], 16),
g: parseInt(result[2], 16),
b: parseInt(result[3], 16),
rgb: parseInt(result[1], 16) + “, ” + parseInt(result[2], 16) + “, ” + parseInt(result[3], 16)
} : null;
}
This is the function that makes the conversion from Hex to RGB, if you want to see the rest of the code you can view the page-source of the DEMO or download the complete Example with all of the files included.
Click » jQuery Converter Hex to RGB « to view the DEMO
Click » jQuery Converter Hex to RGB « to DOWNLOAD the EXAMPLE
If you don’t want to experiment with random typing and guessing of your wanted color you can try jQuery Colour Picker and get the Hex code of your wanted color and then convert it to RGB here. Feel free to combine the code of these two jQuery pugins and make one with mutiple functionalities. If you make one please let me know, I will be more than happy to post it here!
December 2 2011

First of all, let me describe what is the definition and meaning of responsive content slider and responsive design in general. The websites can be browsed from many different browsers and also from many different devices like Smart Phones, Portable Computers, Laptops and desktops with different screen resolutions. If your site have prescribed design probably you’re going to have a problem with browsing the site from different browsers on different devices.
Really??? OMG! My site is viewed from different browsers and devices, is there any solution for this?
– Yes, there is and it’s called responsive design.
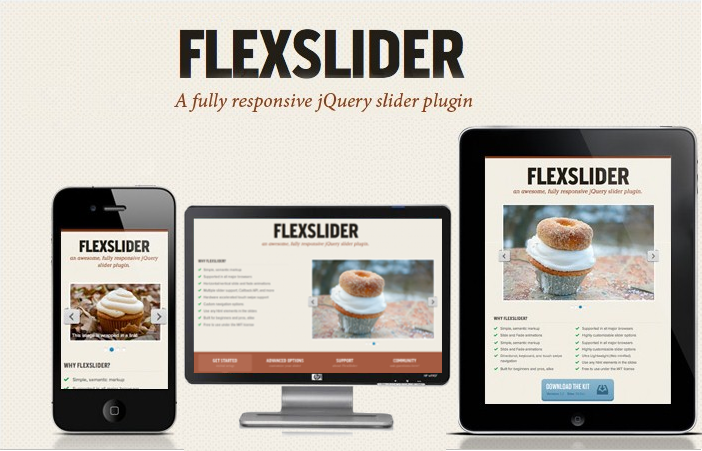
Ok I’ll discuss more about the responsive design in some of the next blog posts. Responsive content slider is a content slider that is working the same on every device. It will adapt the whole content even the images as well, for the device that you’re using. I think that you’ve got the idea that stands behind this, so let’s talk more about the content slider that I want you to use in some of your next projects.
FlexSlider is the best responsive content that I have ever tried. It’s a jQuery based plugin that uses simple, semantic markup to create the slider that is lightweight, the minified version is weighing only 5 Kb. Completely open source, no limitation in any kind of usage. Tested in Safari 4+, Chrome 4+, Firefox 3.6+, Opera 10+, and IE7+. iOS and Android devices are supported as well.
The implementation of FlexSlider – the jQuery Content Slider plugin is very easy. Firs add the following cod in the head of the html.
<link rel="stylesheet" href="flexslider.css" type="text/css"><script src="https://ajax.googleapis.com/ajax/libs/jquery/1.6.2/jquery.min.js"></script><script src="jquery.flexslider.js"></script>
<script type="text/javascript" charset="utf-8"> $(window).load(function() { $('.flexslider').flexslider(); });</script>
<div class="flexslider"> <ul class="slides"> <li> <img src="slide1.jpg" /> </li> <li> <img src="slide2.jpg" /> </li> <li> <img src="slide3.jpg" /> </li> </ul></div>
And then you’re done! Enjoy!
Click » jQuery Slider Plugin – Flex Slider – Responsive jQuery Content Slider « to view the live DEMO
Click » jQuery Slider Plugin – Flex Slider – Responsive jQuery Content Slider « to DOWNLOAD the EXAMPLE
August 15 2011
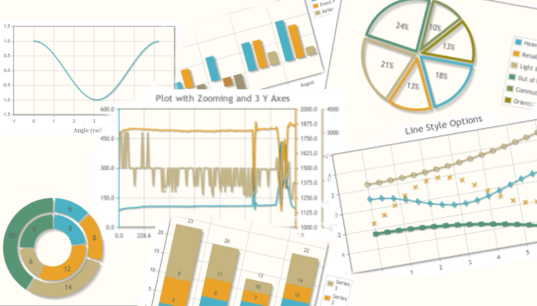
I’m pretty sure that if you have worked on a project where some results have to be displayed in charts you’ll probably have the same problem as me and that is finding nice, easy implementing and custom able solution. Maybe you’ll find some flash solution but in most of the cases it will be very complicated to connect it with database and get an dynamic result and that is not what i want to recommend to you. I give you jqPlot – a jQuery plugin that is perfect solution for displaying result as charts and plots. Another advantage is the fact that is completely free and open source.

Click to download the latest version of the jQuery Chart Plugin jQuery jqPlot
May 16 2011
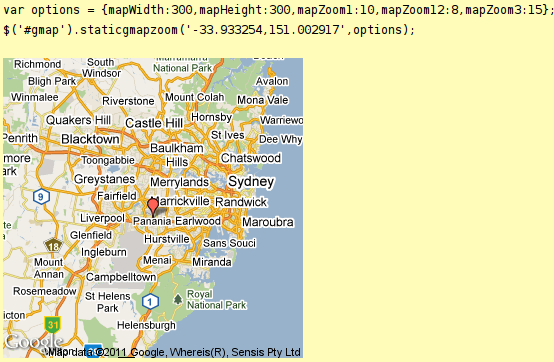
If you are asking yourself “is this something new that I didn’t know about Google maps?” than the answer is no, but this is something that is very useful and can be used in pages where you want to add Google maps to locate the business.
It’s a Google static map that zooms in when you move with the cursor towards the marker of the map. What is really happening on the other side is actually a jQuery code. Besides the main jQuery library there is another JavaScript file that is using the methods form the main library.
The implementation is very simple. In our first example the script only takes coordinates. I use this http://gmaps-samples.googlecode.com/svn/trunk/simplewizard/makestaticmap.html site to get the coordinates for some particular place.

These are the options and their defaul values that you can use and manipulate with to get the wanted combination:
| mapWidth | Integer – The map width in pixels. (Default: 400) |
| mapHeight | Integer – The map height in pixels. (Default: 200) |
| mapZoom1 | Integer – The default zoom level. Between 1 and 21. (Default: 3) |
| mapZoom2 | Integer – The mouseover zoom level. Between 1 and 21. (Default: 6) |
| mapZoom3 | Integer – The maximum zoom level. Between 1 and 21. (Default: 12) |
| mapType | String – Maptype – choose between roadmap, terrain, satellite or hybrid. (Default: roadmap) |
| zoomInDistance | Float – The percentage from center where zoom to level 3 are done. Between 0.0 and 0.99 (Default: 0.25) |
In the second example I’ve used some of the parameters to customise the map. Firstly the height and weight of the map and than the zoom level of the three positions each.

Click » jQuery Static Google Map Hover Zoom « to view the live DEMO
Click » jQuery Static Google Map Hover Zoom « to DOWNLOAD the EXAMPLE
April 12 2011
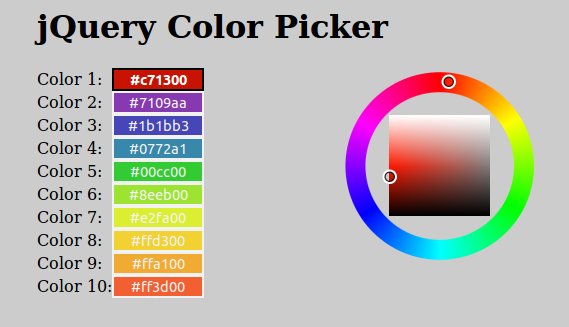
If you have experience in developing sites with a little bit complex user interaction there is a great possibility that you’ll use some color picker, especially if the site has some colour-choosing functionality. And that point you know how long can be inventing and creating a new color picker especially if you don’t know too much about colours and PHP or JavaSciprt functions that work with colours. The next dilemma is about choosing one of the many free colour pickers that will resolve your problem the best.
The colour picker that I want to suggest to you is called “Farbtastic”. Using jQuery as its JavaScript library provides easy implementation and customisation. Farbtastic is not created in flash and doesn’t use a divs with 1×1 pixel dimension instead of that is using transparent .PNG images combined in different layers.

Click » jQuery Color Picker – jQuery Colour Picker – Farbtastic « to view the live DEMO
Click » jQuery Color Picker – jQuery Colour Picker – Farbtastic « to DOWNLOAD the EXAMPLE
January 20 2011

Click here » The IMGr jQuery Plugin used for Landing page with Rounded Images « to view the EXAMPLE.
Click here » The IMGr jQuery Plugin used for Landing page with Rounded Images « to download the full DEMO.
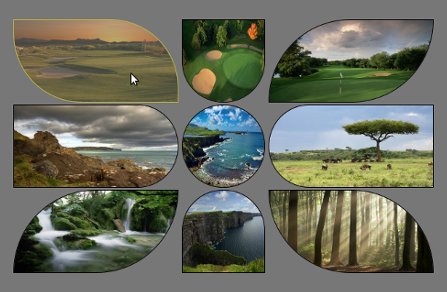
IMGr stands for Image Rounder and it’s a jQuery plugin and in this tutorial I used it to create a nice looking and unique landing page. For the developers it is very easy to create something that will be still and never be changed so the real troubles and headaches are coming when something twisted has to be editable from some CMS. This example can be easily modified to your CMS and these rounded images can be replaced from there; no need for photoshop editing of the images and creating PNG images that will be transparent because the images are normal rectangle .JPG images, just like these.

This is the HTML that I’ve used for this example.
<div style=”padding:100px 100px 200px 500px;”>
<div>
<a id=”link1″ href=“#”><img class=”ex1″ src=“timthumb1.jpg” height=”120″ width=”240″ /></a>
<a id=”link2″ href=“#”><img class=”ex2″ src=“timthumb2.jpg” height=”120″ width=”120″ /></a>
<a id=”link3″ href=“#”><img class=”ex3″ src=“timthumb3.jpg” height=”120″ width=”240″ /></a>
</div>
<div>
<a id=”link4″ href=“#”><img class=”ex4″ src=“timthumb4.jpg” height=”120″ width=”240″ /></a>
<a id=”link5″ href=“#”><img class=”ex5″ src=“timthumb5.jpg” height=”120″ width=”120″ /></a>
<a id=”link6″ href=“#”><img class=”ex6″ src=“timthumb6.jpg” height=”120″ width=”240″ /></a>
</div>
<div>
<a id=”link7″ href=“#”><img class=”ex7″ src=“timthumb7.jpg” height=”120″ width=”240″ /></a>
<a id=”link8″ href=“#”><img class=”ex8″ src=“timthumb8.jpg” height=”120″ width=”120″ /></a>
<a id=”link9″ href=“#”><img class=”ex9″ src=“timthumb9.jpg” height=”120″ width=”240″ /></a>
</div>
</div>
As you can see the HTML structure, there is one div that is used as a wrapper and three divisions within. Every division contains three image links and their dimensions are set exactly to fit with my design. These are the links that will lead you to the following pages of your web site. Every anchor has it’s own id and every image is associated to specific class. Now it’s time to use the IMGr plugin. Two javascript files must be included, first the main jQuery library and than the IMGr.
After the setup is done, it’s time to use the IMGr plugin. Let’s examine this line of code $(“img.ex1″).imgr({size:”1px”,color:”black”,radius:”0px 120px 0px 120px”}); Via first selector we have selected all images that are associated with ext1 class. The .img() method is applied to all these images. This method is wrapping the images with a span element and there are a few parameters that can be set.
First parameter is the size of the border that can be set and shown on the rounded image and it must be in pixels.
The second is the colour of the border. There are approximately 100 predefined colors such as aqua, azure, beige, bisque, black, blue, violet, brown etc. also you can write the hex code for the colour that you want.
Radius is the third parameter that can provide you to set the radius of every angle of the image and it must be in this format radius:”0px 120px 0px 120px”. Every number is associated with the radius of specific angle.
First – TL(Top Left); Second – TR(Top Right); Third – BR(Bottom Right); Fourth – BL(Bottom Left).
There is another parameter that can be set and that is the style of the border but I don’t use it for this example because its default value is set to “solid” and that was the style that I want to use so that’s why I don’t change it.
This will work on every browser including IE6. I’ve added one more functionality that created me troubles only in IE8 and I haven’t fixed it yet. I’ve added some pieces of jQuery code.
$(“img.ex1″).hover(function() {
$(this).imgr({size:”1px”,color:”yellow”,radius:”0px 100px 0px 100px”});
$(“#link1”).children(“span.imgr”).animate({opacity: ‘0.5’}, 80);
} ,
function() {
$(this).imgr({size:”1px”,color:”black”,radius:”0px 120px 0px 120px”});
$(“#link1”).children(“span.imgr”).animate({opacity: ‘1’}, 80);
} );
As you can see, I’ve created hover function for every image that makes some transformations such as changing the colour of the border (in this case to yellow) and changing the radius for some angles. Also I’ve used the .animate() method to create a nice animation that makes quick reducing the opacity of the image. Also there is a callback function that resets the changed properties to defaults.
Here is the full jQuery code, except for the other seven remaining images.
Click here » The IMGr jQuery Plugin used for Landing page with Rounded Images « to view the EXAMPLE.
Click here » The IMGr jQuery Plugin used for Landing page with Rounded Images « to download the full DEMO.
December 15 2010

In the process of creating a user friendly web form, the first thing that comes to the developer’s mind is to describe the kind of data that the user needs to input properly. Sometimes a simple label can do the trick, you put “Username” label in front of a text input field named username and all is done.
Problem occurs when, for an example, you want to tell to the user more info about the data that you want to be inserted in, so the label becomes longer. Eg. “Insert your first pet name”. The form labels have different length and the form looks messy.
One solution can be to top place the labels over the input fields but if we want to make it more stylish we can use the In-Field jQuery plug-in for that.
Click here » Using jQuery Plug-ins for better web forms (In-Field Labels) « to download the full demo.
")
To make the plug-in work you have to follow a special structure for the form layout. An example is:
<p>
<label for=”field_id”>Label Text</label><br />
<input type=”text” name=”field_id” value=”” id=”field_id” />
</p>
In addition to this some CSS is needed to position the label.
form p { position:relative }
label { position:absolute; top:0; left:0}
The wrapper around the label and the field can be any element you want. The <p> element here is just used as an example.
Now to make everything work, a small javascript is added:
$(document).ready(function(){
$(“label”).inFieldLabels();
});
and the effect is done.
")
This plug-in has two options that can be set when we initialise it. The first one “fadeOpacity” determines how much the label will fade when the input field is focused (default: 0.5) and the second, “fadeDuration”, controls how fast the animation is going (default: 300).
At the end it’s important to mention that sometimes this plug-in can have some problems with auto-complete forms. To prevent this just add autocomplete=”off” to the input fields that you have labels on.
Click here » Using jQuery Plug-ins for better web forms (In-Field Labels) « to download the full demo. Here you can see the original post.
December 7 2010
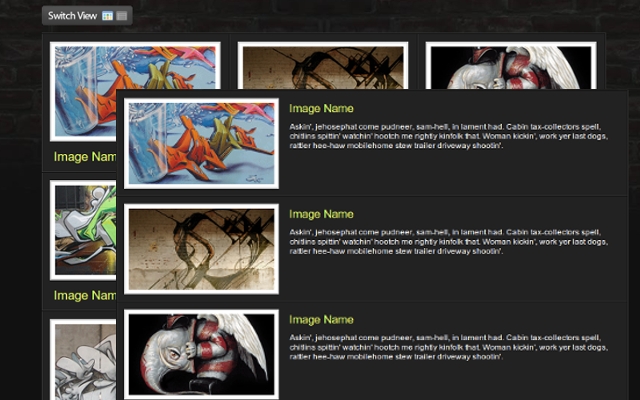
The web user today wants the sites to be more interactive and that interaction to be done on faster and more user-friendly level. Now I’m going to show you a few-step tutorial that will help you to increase the interaction on your site.
You can download » Creating switch view option using jquery and css « full demo files packed in zip file!
Lets start!
Down below you can see the HTML and CSS for the whole wrapper and its consist of unordered list with list items and their css attributes will be manipulated via jQuery to get the different view.
In every list item we put the content that consisting of div and image with link, heading and description within. For every element thats nested in the list item we associate and a style too.

I hope that you’ll find a perfect situation to use this example.
You can download » Creating switch view option using jquery and css « full demo files packed in zip file!
Beacause of the comment of Cyber Carl, I’ve created some new (reverse) version of this example first to load the grid and then to switch to list view; you can download it » Creating switch view option using jquery and css(reverse) «
September 27 2010
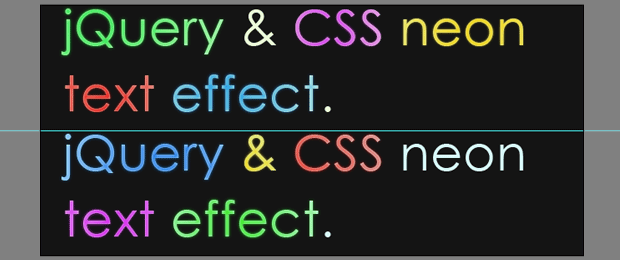
The previous blog post was creating glossy text using only CSS. In this post I’m going to show how to create Neon Glow Text, but this time I’m going to use some jQuery (a JavaScript library); besides, I’m going to use some CSS. Let’s start with the first step.
First of all we should create an image with the two different color versions of the text, and helped by the jQuery we can create a smooth transition between them. To create the image we’re going to use Photoshop, so we’re creating an empty 650px X 300px document and set #141414 as a hex code for background color.
For the text you can use your favorite font-family, for this example I’ll use Century Gothic with a size of 60px and I’ll type “jQuery & CSS liquid text effect” two times for the heading text.

After this pressing the Ctrl and click the text layer’s icon in the layers panel to select it.


You can choose a different color if you want but these are used for this example.

The final image shold look like this.
The HTML markap is very easy, we are going to use container (in this case h1) to wrap two span elements. The span elements will are having different id’s because they represent the different layers.
<h1 id="neonText">Neon Text Effect With jQuery & CSS. |
<span class="textVersion" id="layer1"> |
<span class="textVersion" id="layer2"> |
|
Layer1 is above the Layer2, and we are going to reduce it’s opacity to get an smooth neon glow effect.
The text is the best type of content for SEO because the crawler can’t read what’s written on the images.
This example is made using negative text-indent on the text but, with my last research i found that negative text event is used by many spammers, and it’s categorized as a “black hat” technique for SEO. So I’ve tried to comment the line for the text-indent and the whole exmple was working again.
/* The two text layers */ |
#neonText span{ |
width:700px; |
height:150px; |
position:absolute; |
left:0; |
top:0; |
background:url('img/text.jpg') no-repeat left top; |
} |
|
span#layer1{ |
z-index:100; |
} |
span#layer2{ |
background-position:left bottom; |
z-index:99; |
} |
/* The h1 tag that holds the layers */ |
#neonText{ |
height:150px; |
margin:180px auto 0; |
position:relative; |
width:650px; |
/*text-indent:-9999px;*/ |
} |
And the last step is the jQuery code. We are creating transformational animation between the two layers.
$(document).ready(function(){ |
setInterval(function(){ |
// Selecting only the visible layers: |
var versions = $('.textVersion:visible'); |
if(versions.length<2){ |
// If only one layer is visible, show the other |
$('.textVersion').fadeIn(800); |
} |
else{ |
// Hide the upper layer |
versions.eq(0).fadeOut(800); |
|
} |
},1000); |
}); |
You can download the source here
 Web Design
 Telco Drafting
 Marketing, SEO, PPC & Social
 Commercial & Residential
 Graphic Design
 3D Modelling
 Hosting & Support
 Game Development
 Mobile Apps
 Other Services