Creating Switch view option using jQuery and CSS
December 7 2010
Creating Switch view option using jQuery and CSS
The web user today wants the sites to be more interactive and that interaction to be done on faster and more user-friendly level. Now I’m going to show you a few-step tutorial that will help you to increase the interaction on your site.
You can download » Creating switch view option using jquery and css « full demo files packed in zip file!
Lets start!
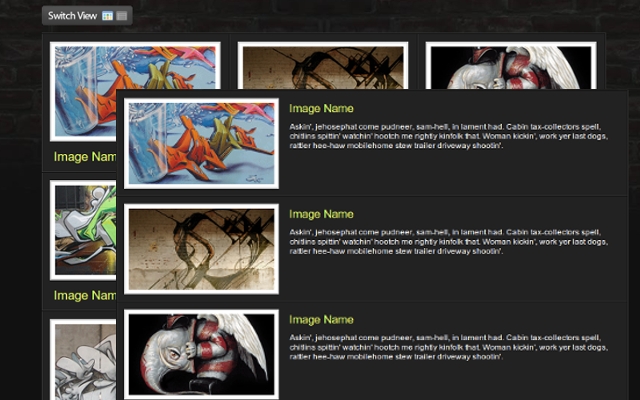
1st Step: Creating the wrapper
Down below you can see the HTML and CSS for the whole wrapper and its consist of unordered list with list items and their css attributes will be manipulated via jQuery to get the different view.
HTML
<ul class = “display”>
<li></li>
<li></li>
<li></li>
</ul>
CSS
ul.display li a {
color: #e7ff61;
text-decoration: none;
}
ul.display li .content_block {
padding: 0 10px;
}
ul.display li .content_block h2 {
margin: 0;
padding: 5px;
font-weight: normal;
font-size: 1.7em;
}
ul.display li .content_block p {
margin: 0;
padding: 5px 5px 5px 245px; /*–The left padding keeps the
content from flowing under the image–*/
font-size: 1.2em;
}
ul.display li .content_block a img{ /*–Double border technique–*/
padding: 5px;
border: 2px solid #ccc;
background: #fff;
margin: 0 15px 0 0;
float: left;
}
2nd Step: Make some Style for the Content
In every list item we put the content that consisting of div and image with link, heading and description within. For every element thats nested in the list item we associate and a style too.
HTML
<li>
<div class=“content_block”>
<a href=“#”><img src=“sample.gif” alt=“” /></a>
<h2><a href=“#”>Image Name</a></h2>
<p>Description goes here</p>
</div>
</li>
CSS
ul.display li a {
color: #e7ff61;
text-decoration: none;
}
ul.display li .content_block {
padding: 0 10px;
}
ul.display li .content_block h2 {
margin: 0;
padding: 5px;
font-weight: normal;
font-size: 1.7em;
}
ul.display li .content_block p {
margin: 0;
padding: 5px 5px 5px 245px; =“color: #777;”>/*–The left padding keeps the
content from flowing under the image–*/>
font-size: 1.2em;
}
ul.display li .content_block a img{ =“color: #777;”>/*–Double border technique–*/>
padding: 5px;
border: 2px solid #ccc;
background: #fff;
margin: 0 15px 0 0;
float: left;
}
3rd Step: Creating CSS for the second view
CSS
ul.thumb_view li{ width: 250px; } =“color: #777;”>/*–Switch the width
to accommodate for the three column layout–*/>
ul.thumb_view li h2 { display: inline; }
ul.thumb_view li p{ display: none; }
ul.thumb_view li .content_block a img { margin: 0 0 10px; }
For the image link that will present the switch for the view we use a technique called CSS sprites.
HTML
<a href=“#” class=“switch_thumb”>Switch Display</a>
CSS
a.switch_thumb {
width: 122px;
height: 26px;
line-height: 26px;
padding: 0;
margin: 10px 0;
display: block;
background: url(switch.gif) no-repeat;
outline: none;
text-indent: -9999px;
}
a.swap { background-position: left bottom; }
a:hover.switch_thumb {
filter:alpha(opacity=75);
opacity:.75;
-ms-filter: “progid:DXImageTransform.Microsoft.Alpha(Opacity=75)”;
}
And finaly the jQuery code that makes the magic touch of this example. Remember that you have to include the main library between the tags of the html document. You can download the latest version from
here.
jQuery
<script type=“text/javascript”>
$(document).ready(function(){ $(“a.switch_thumb”).toggle(function(){
$(this).addClass(“swap”);
$(“ul.display”).fadeOut(“fast”, function() {
$(this).fadeIn(“fast”).addClass(“thumb_view”);
});
}, function () {
$(this).removeClass(“swap”);
$(“ul.display”).fadeOut(“fast”, function() {
$(this).fadeIn(“fast”).removeClass(“thumb_view”);
});
});});
</script>
I hope that you’ll find a perfect situation to use this example.
You can download » Creating switch view option using jquery and css « full demo files packed in zip file!
UPDATE
Beacause of the comment of Cyber Carl, I’ve created some new (reverse) version of this example first to load the grid and then to switch to list view; you can download it » Creating switch view option using jquery and css(reverse) «

 Web Design
 Telco Drafting
 Marketing, SEO, PPC & Social
 Commercial & Residential
 Graphic Design
 3D Modelling
 Hosting & Support
 Game Development
 Mobile Apps
 Other Services