Answer 8 quick questions to get a personalised quote from Webski
February 20 2012
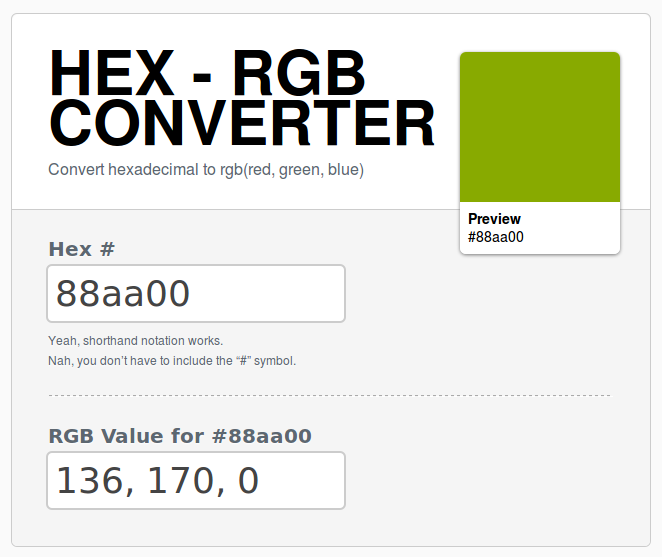

I wrote this blog post for everyone that have searched for Hexadecimal to RGB converter and not found something according to their needs. This Hex-RGB converter is not only easy for installation, also it is written in jQuery and that makes it more easier for modification and customisation.
hexToRgb: function(hex) {
var result = /^#?([a-fd]{2})([a-fd]{2})([a-fd]{2})$/i.exec(hex);
return result ? {
r: parseInt(result[1], 16),
g: parseInt(result[2], 16),
b: parseInt(result[3], 16),
rgb: parseInt(result[1], 16) + “, ” + parseInt(result[2], 16) + “, ” + parseInt(result[3], 16)
} : null;
}
This is the function that makes the conversion from Hex to RGB, if you want to see the rest of the code you can view the page-source of the DEMO or download the complete Example with all of the files included.
Click » jQuery Converter Hex to RGB « to view the DEMO
Click » jQuery Converter Hex to RGB « to DOWNLOAD the EXAMPLE
If you don’t want to experiment with random typing and guessing of your wanted color you can try jQuery Colour Picker and get the Hex code of your wanted color and then convert it to RGB here. Feel free to combine the code of these two jQuery pugins and make one with mutiple functionalities. If you make one please let me know, I will be more than happy to post it here!
January 16 2012
This is a simple tutorial that will help you to add snow flakes to your site just like these on this page. This period of the year we’re celebrating Christmas and The New Year. Australia is celebrating the New Year on beach with ice cocktails but not all of the visitors of our Blog are from Australia. We’re glad that our blog have visitors from all around the world, and this post is dedicated to the visitors from the North Hemisphere where there is snow in this period of the year.
It’s not an obligation to add snow flakes, you can replace the pictures of snowflakes with your logo or your hottest product for example and than add a link that will lead to the page of your top product.

The script is very easy for implementation because you have to include the script and place the snow-falke images in the appropriate folder on your server (in our example “/images”).
<script src="http://www.yourdomain.com/scripts/snow.js">script>Click to » Download the JavaScript file «
If you open and view snow.js you can see that every functionality is placed there, so if you want to modify the script you should make the changes in this file.
The file is starting with these lines of code:
var X = 20;	   /// set the number of different snowflakes to be shown, ///
                   ///write 1  if you want only one type of snowflake ///
var SNOW_no = 20;  /// set the number of snowflakes to be shown at once ///
These lines of code enables to show showflakes with random size:
SNOW_RANDOM1 = Math.floor(Math.random()*100);
	SNOW_RANDOM = Math.floor(Math.random()*SNOW_RANDOM1);
	if (SNOW_RANDOM1 >= 50)
	{
		SNOW_RANDOM2= 70 + SNOW_RANDOM+"%";
	}
	else if(SNOW_RANDOM1 < 50)
	{
		SNOW_RANDOM2= 100 - SNOW_RANDOM+"%";
	}
where the minimum is 50% and the maximum is 170% of the image.
This line of the JavaScript file makes randomisation of the snow flakes:
SNOW_Picture = "http://www.yourdomain.com/scripts/images/snow-flakes-"+Math.floor(Math.random()*X+1)+".gif";
If you want to add more snow flakes you should increase the number of the var X = 20; and name the image according to this pattern snow-flakes-number_of_the_image.gif and don’t forget to upload it in the /images folder on you server.
I hope that you’ll like and enjoy the script.
Click » JavaSript tutorial add snow flakes to your site « to DOWNLOAD the EXAMPLE
January 12 2012

 The Internet has become an interactive place where you can sell and buy products & services and it’s a medium for communicating business benefits with clients, customers and associates and it’s a place where your business gets visible online. When choosing a Web Design Sydney agency, the first step that you make is to check their portfolio and some of the web sites recently done. See if their work suits your desires and go well with the features and tools that you want to be used on your web site: screens, forms, links, navigation, colours and themes that you prefer and need.
A high-quality website design combines a variety of futures and elements to make the website successful and it represents the reflection of technology and creative revelation. Having an eye catching web site is not difficult however prior to hiring a professional Web Design Sydney agency few basic factors that contribute to a classy web site should always be kept in your mind.
Why having a unique web site is important to you? A unique custom web site with good graphics and visual effects can bring many benefits to your business. You need a unique place to advertise your business in this overcrowded market. As the web site is your online representative and offers your product or service 24/7, the exclusivity and the uniqueness can build value to your product or service, it can inform potential customers and help them choose wisely, it can create easier way to get in contact with you and finally can set you apart from the competition, can burst out your business to the top and open new gates for your business success.
A good website design is the first and the most important. The design aspects, aesthetics and its functionalities are the base for creating a web site and for that reason intent consultation with the Web Design Sydney agency is needed during the website building process hence down the road changes will be easier and less expensive. A web site with one of a kind looking web design, strong and persuasive content, high-quality information architecture and efficient futures provides excellent first impression and contributes to generate a great online presence and experience.
 Content is King. Content is the most vital part of your website. It attracts traffic to your site, it retains potential customers on site and helps your web site to increase and hold on to a good position in the search engines. High-quality information architecture is produced by competently labeled content in order to accomplish best usability and accessibility.
Creating a successful website is a blend and crystallization between the company goals -their web strategy and on the other the needs and the requirements of the audience. This is accomplished after extensive research and an efficient well-organized strategy. Placing all of this in one may seem a bit difficult, but taking it down step by step in the web design creating process it can give you a web site that is fast and easy to navigate and efficient to bring in the preferred online traffic.
A user friendly and creative website with unique and innovative appearance is the key to a successful business, but unless you’ve put a lot of energy, time, vision, devotion and creativity into making your web site you will not see any results in near future. With such fierce competition on the net the web design has become an area that requires specialization so if you want to survive your business go for Web Design Sydney agency with professional approach, strong portfolio, satisfied clientele and years of experience.
December 30 2011
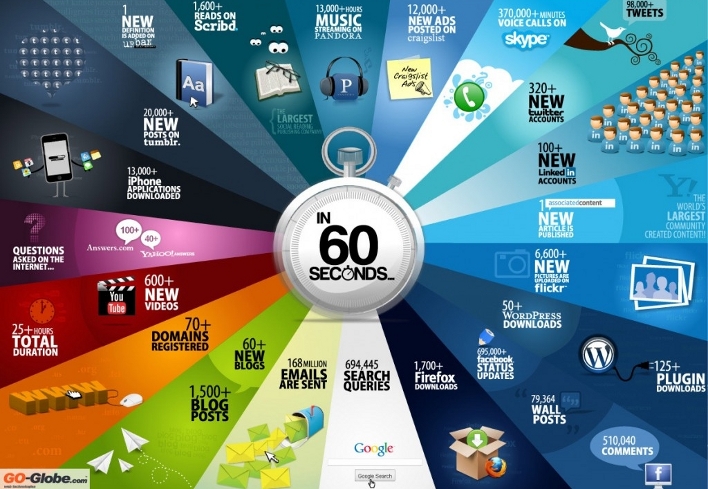

You can’t even imagine how live and iteractive is the WEB today! ALL IN 60 seconds Over 700 000 Status Updates, Almost 800 000 Wall Posts and Half milion Comments on Facebook More than 1700 Downloads of Mozilla Firefox Near 695 000 Search Queries on Google 168 Milions of emails are sent 60 New Blogs 1500 New Bog Posts 70 new domains registred 600 new videos on with 25 hour of duration on YouTube
December 2 2011
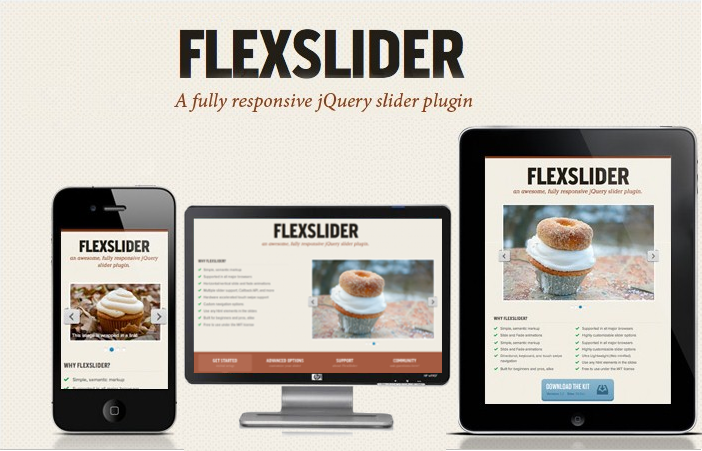

First of all, let me describe what is the definition and meaning of responsive content slider and responsive design in general. The websites can be browsed from many different browsers and also from many different devices like Smart Phones, Portable Computers, Laptops and desktops with different screen resolutions. If your site have prescribed design probably you’re going to have a problem with browsing the site from different browsers on different devices.
Really??? OMG! My site is viewed from different browsers and devices, is there any solution for this?
– Yes, there is and it’s called responsive design.
Ok I’ll discuss more about the responsive design in some of the next blog posts. Responsive content slider is a content slider that is working the same on every device. It will adapt the whole content even the images as well, for the device that you’re using. I think that you’ve got the idea that stands behind this, so let’s talk more about the content slider that I want you to use in some of your next projects.
FlexSlider is the best responsive content that I have ever tried. It’s a jQuery based plugin that uses simple, semantic markup to create the slider that is lightweight, the minified version is weighing only 5 Kb. Completely open source, no limitation in any kind of usage. Tested in Safari 4+, Chrome 4+, Firefox 3.6+, Opera 10+, and IE7+. iOS and Android devices are supported as well.
The implementation of FlexSlider – the jQuery Content Slider plugin is very easy. Firs add the following cod in the head of the html.
<link rel="stylesheet" href="flexslider.css" type="text/css"><script src="https://ajax.googleapis.com/ajax/libs/jquery/1.6.2/jquery.min.js"></script><script src="jquery.flexslider.js"></script>
<script type="text/javascript" charset="utf-8"> $(window).load(function() { $('.flexslider').flexslider(); });</script>
<div class="flexslider"> <ul class="slides"> <li> <img src="slide1.jpg" /> </li> <li> <img src="slide2.jpg" /> </li> <li> <img src="slide3.jpg" /> </li> </ul></div>
And then you’re done! Enjoy!
Click » jQuery Slider Plugin – Flex Slider – Responsive jQuery Content Slider « to view the live DEMO
Click » jQuery Slider Plugin – Flex Slider – Responsive jQuery Content Slider « to DOWNLOAD the EXAMPLE
August 31 2011

Ecommerce websites have their own unique character that is designed to lead the visitor to one simple task – make an online purchase. A web designer needs to consider a variety of online selling principles while designing an ecommerce website. In this article we will try to take a look at some of the major design aspects that you must have in an ecommerce website.
Many of you are probably already asking why ecommerce website design is different from any other website design. They all need to be attractive, well organised and use the right colors that fits the website spirit and so on. Your instincts are good. However a close look at some successful ecommerce websites will reveal the conceptual differences that are typical in a successful ecommerce website.
An ecommerce website needs to follow certain selling principles:
1. Give the user a pleasant experience during his online shopping.
2. Make certain you provide sufficient information on who owns the website and
why they should be trusted.
3. The website must be easy to use. If it isn’t, the visitor will go to your competitor.
Those principles are not new. We all know those basics from our day to day experiences at the local store, shopping center and every other market place that is waiting for us to open up our wallets. The big challenge for a web designer is how to translate those conventional marketing techniques to the virtual world of the internet. I’m sure you’ve all noticed that in most supermarkets the bread stand is placed at the far end of the building, yet you can smell the fresh bread at the entrance. That has been done deliberately. Marketers use our sense of smell to draw us through the store where we are exposed to all sorts of tempting goodies as we go to get our loaf of bread.
How do you draw an imaginarily path in a web page? A path designed to lead the visitor to do what you want him to do…make an online purchase. Unlike the supermarket our website has no smell. In a website the distance from one point to the other is pretty much the same, so the exit is always right there. In a website you can try to order the “shelf” in the way you think will best expose the visitor to many of your products, but there is always a chance that he will find a short cut to another page that can also be the way off your site.
As we can be see, although putting your products on the web is much easier then renting space and opening a supermarket. However, selling your products on the web can be difficult.
A good ecommerce website design will lead the visitor to the right page in one click or two at the most. Sometime web designers will use techniques that would never be considered for non-ecommerce websites. Everyone has seen at least one sales letter website. On these web pages the only link is to the order form. Sales letters are not the most typical ecommerce website because they usually sell only one product. That allows the web designer the ability to exaggerate the one click principle and make it an advantage. All the facts about the product have been presented to the user is a smart way while every few lines he has the option to click on the order form. If he is not yet convinced he will have the option to continue to read more facts and testimonials about the products. Believe it or not, those sales letter websites are actually selling.
“What about online shops?” Online shops have to deal with more then one product. Of course, the greater number of products increases the complexity of the website. Sophisticated ecommerce websites use a variety of personalisation technologies in an effort to determine the best selection of products to offer to the visitor. Personalisation technologies are a major part of advanced ecommerce websites. However this topic is beyond the scope of this article. The cleverness of an ecommerce website’s personalisation technology has a major influence on its design. The first to use such technology was Amazon.com who decided to push their client’s books to a visitor based on that visitor’s past orders combined with the statistics they had collected on all visitors used to predict what someone looking at a specific book might also be interested in reading. Today the goal is to try to predict what to offer the user on his first visit as well.
An ecommerce web design is also about the layout. One important aspect is where the user’s eyes look first when accessing a web page. Lots of research has been done on this topic. Most research showed that the middle left side area will attract the most attention followed by the center of the page. By using these techniques web designers try to draw the “walking path” for the visitor’s eye, much like what was done at the supermarket. An experienced ecommerce web designer will know how to create designs to meets those demands.
If you are about to open an ecommerce website or you are already own one, make sure you understand the web design principles for online selling.
If you ave any questions in regards to ecommerce web design and development do not hesitate to contact us and one of our friendly team members will help you out.
August 15 2011
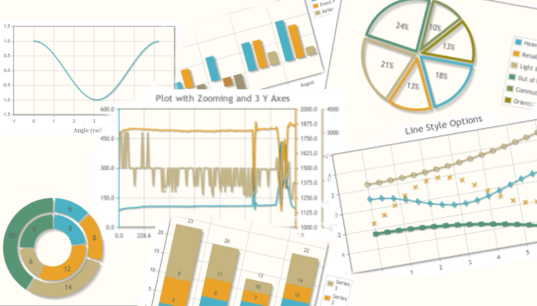
I’m pretty sure that if you have worked on a project where some results have to be displayed in charts you’ll probably have the same problem as me and that is finding nice, easy implementing and custom able solution. Maybe you’ll find some flash solution but in most of the cases it will be very complicated to connect it with database and get an dynamic result and that is not what i want to recommend to you. I give you jqPlot – a jQuery plugin that is perfect solution for displaying result as charts and plots. Another advantage is the fact that is completely free and open source.

Click to download the latest version of the jQuery Chart Plugin jQuery jqPlot
May 16 2011
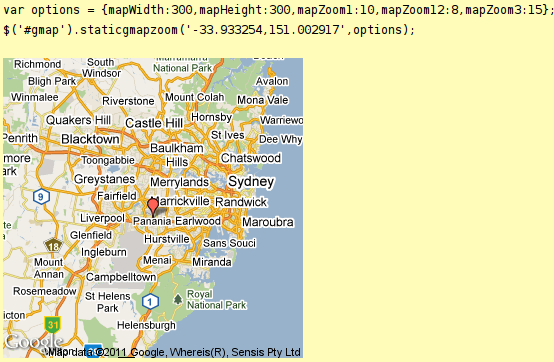
If you are asking yourself “is this something new that I didn’t know about Google maps?” than the answer is no, but this is something that is very useful and can be used in pages where you want to add Google maps to locate the business.
It’s a Google static map that zooms in when you move with the cursor towards the marker of the map. What is really happening on the other side is actually a jQuery code. Besides the main jQuery library there is another JavaScript file that is using the methods form the main library.
The implementation is very simple. In our first example the script only takes coordinates. I use this http://gmaps-samples.googlecode.com/svn/trunk/simplewizard/makestaticmap.html site to get the coordinates for some particular place.

These are the options and their defaul values that you can use and manipulate with to get the wanted combination:
| mapWidth | Integer – The map width in pixels. (Default: 400) |
| mapHeight | Integer – The map height in pixels. (Default: 200) |
| mapZoom1 | Integer – The default zoom level. Between 1 and 21. (Default: 3) |
| mapZoom2 | Integer – The mouseover zoom level. Between 1 and 21. (Default: 6) |
| mapZoom3 | Integer – The maximum zoom level. Between 1 and 21. (Default: 12) |
| mapType | String – Maptype – choose between roadmap, terrain, satellite or hybrid. (Default: roadmap) |
| zoomInDistance | Float – The percentage from center where zoom to level 3 are done. Between 0.0 and 0.99 (Default: 0.25) |
In the second example I’ve used some of the parameters to customise the map. Firstly the height and weight of the map and than the zoom level of the three positions each.

Click » jQuery Static Google Map Hover Zoom « to view the live DEMO
Click » jQuery Static Google Map Hover Zoom « to DOWNLOAD the EXAMPLE
April 12 2011
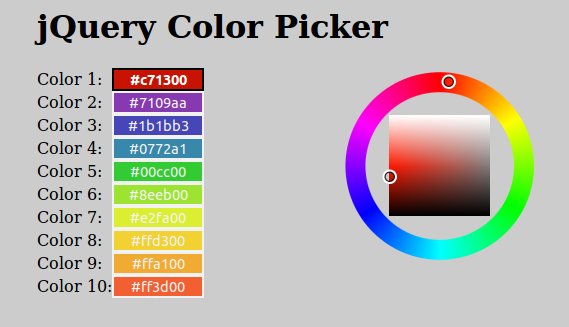
If you have experience in developing sites with a little bit complex user interaction there is a great possibility that you’ll use some color picker, especially if the site has some colour-choosing functionality. And that point you know how long can be inventing and creating a new color picker especially if you don’t know too much about colours and PHP or JavaSciprt functions that work with colours. The next dilemma is about choosing one of the many free colour pickers that will resolve your problem the best.
The colour picker that I want to suggest to you is called “Farbtastic”. Using jQuery as its JavaScript library provides easy implementation and customisation. Farbtastic is not created in flash and doesn’t use a divs with 1×1 pixel dimension instead of that is using transparent .PNG images combined in different layers.

Click » jQuery Color Picker – jQuery Colour Picker – Farbtastic « to view the live DEMO
Click » jQuery Color Picker – jQuery Colour Picker – Farbtastic « to DOWNLOAD the EXAMPLE
January 20 2011

Click here » The IMGr jQuery Plugin used for Landing page with Rounded Images « to view the EXAMPLE.
Click here » The IMGr jQuery Plugin used for Landing page with Rounded Images « to download the full DEMO.
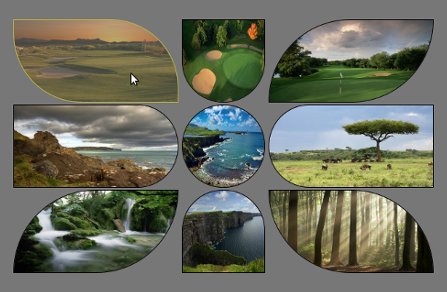
IMGr stands for Image Rounder and it’s a jQuery plugin and in this tutorial I used it to create a nice looking and unique landing page. For the developers it is very easy to create something that will be still and never be changed so the real troubles and headaches are coming when something twisted has to be editable from some CMS. This example can be easily modified to your CMS and these rounded images can be replaced from there; no need for photoshop editing of the images and creating PNG images that will be transparent because the images are normal rectangle .JPG images, just like these.

This is the HTML that I’ve used for this example.
<div style=”padding:100px 100px 200px 500px;”>
<div>
<a id=”link1″ href=“#”><img class=”ex1″ src=“timthumb1.jpg” height=”120″ width=”240″ /></a>
<a id=”link2″ href=“#”><img class=”ex2″ src=“timthumb2.jpg” height=”120″ width=”120″ /></a>
<a id=”link3″ href=“#”><img class=”ex3″ src=“timthumb3.jpg” height=”120″ width=”240″ /></a>
</div>
<div>
<a id=”link4″ href=“#”><img class=”ex4″ src=“timthumb4.jpg” height=”120″ width=”240″ /></a>
<a id=”link5″ href=“#”><img class=”ex5″ src=“timthumb5.jpg” height=”120″ width=”120″ /></a>
<a id=”link6″ href=“#”><img class=”ex6″ src=“timthumb6.jpg” height=”120″ width=”240″ /></a>
</div>
<div>
<a id=”link7″ href=“#”><img class=”ex7″ src=“timthumb7.jpg” height=”120″ width=”240″ /></a>
<a id=”link8″ href=“#”><img class=”ex8″ src=“timthumb8.jpg” height=”120″ width=”120″ /></a>
<a id=”link9″ href=“#”><img class=”ex9″ src=“timthumb9.jpg” height=”120″ width=”240″ /></a>
</div>
</div>
As you can see the HTML structure, there is one div that is used as a wrapper and three divisions within. Every division contains three image links and their dimensions are set exactly to fit with my design. These are the links that will lead you to the following pages of your web site. Every anchor has it’s own id and every image is associated to specific class. Now it’s time to use the IMGr plugin. Two javascript files must be included, first the main jQuery library and than the IMGr.
After the setup is done, it’s time to use the IMGr plugin. Let’s examine this line of code $(“img.ex1″).imgr({size:”1px”,color:”black”,radius:”0px 120px 0px 120px”}); Via first selector we have selected all images that are associated with ext1 class. The .img() method is applied to all these images. This method is wrapping the images with a span element and there are a few parameters that can be set.
First parameter is the size of the border that can be set and shown on the rounded image and it must be in pixels.
The second is the colour of the border. There are approximately 100 predefined colors such as aqua, azure, beige, bisque, black, blue, violet, brown etc. also you can write the hex code for the colour that you want.
Radius is the third parameter that can provide you to set the radius of every angle of the image and it must be in this format radius:”0px 120px 0px 120px”. Every number is associated with the radius of specific angle.
First – TL(Top Left); Second – TR(Top Right); Third – BR(Bottom Right); Fourth – BL(Bottom Left).
There is another parameter that can be set and that is the style of the border but I don’t use it for this example because its default value is set to “solid” and that was the style that I want to use so that’s why I don’t change it.
This will work on every browser including IE6. I’ve added one more functionality that created me troubles only in IE8 and I haven’t fixed it yet. I’ve added some pieces of jQuery code.
$(“img.ex1″).hover(function() {
$(this).imgr({size:”1px”,color:”yellow”,radius:”0px 100px 0px 100px”});
$(“#link1”).children(“span.imgr”).animate({opacity: ‘0.5’}, 80);
} ,
function() {
$(this).imgr({size:”1px”,color:”black”,radius:”0px 120px 0px 120px”});
$(“#link1”).children(“span.imgr”).animate({opacity: ‘1’}, 80);
} );
As you can see, I’ve created hover function for every image that makes some transformations such as changing the colour of the border (in this case to yellow) and changing the radius for some angles. Also I’ve used the .animate() method to create a nice animation that makes quick reducing the opacity of the image. Also there is a callback function that resets the changed properties to defaults.
Here is the full jQuery code, except for the other seven remaining images.
Click here » The IMGr jQuery Plugin used for Landing page with Rounded Images « to view the EXAMPLE.
Click here » The IMGr jQuery Plugin used for Landing page with Rounded Images « to download the full DEMO.
 Web Design
 Telco Drafting
 Marketing, SEO, PPC & Social
 Commercial & Residential
 Graphic Design
 3D Modelling
 Hosting & Support
 Game Development
 Mobile Apps
 Other Services